How to Connect and Use Antigravity with AgentRQ
Google Antigravity is Google's AI coding agent, and it speaks the Agent Client Protocol. AgentRQ speaks ACP too, through the open-source ACP Gateway. Put the two together and Antigravity stops being a thing you drive from your desk: tasks you file from your phone land in its queue, it asks for permission through the AgentRQ UI, and you watch it work from a browser.
This is the whole setup, start to finish — sign-in, workspace, config, Antigravity's own login, picking a Gemini model, and letting it run. It takes about five minutes, and most of that is the one-time download.
Before you start
- → Node.js 24 or newer. The gateway is run with
npx, so there is nothing to install. - → An AgentRQ account — free during beta.
- → A Google account, or a Gemini API key. Antigravity will not open a session until it has been logged in to.
One platform caveat worth knowing up front. The ACP registry publishes Antigravity for five targets:
| Platform | Supported |
|---|---|
macOS Apple Silicon (darwin-aarch64) |
Yes |
macOS Intel (darwin-x86_64) |
No |
| Linux x86_64 / arm64 | Yes |
| Windows x86_64 / arm64 | Yes |
There is no Intel-macOS build in the registry, so on an Intel Mac the gateway has nothing to install. Everywhere else you are fine.
Step 1 — Sign in to AgentRQ
Go to app.agentrq.com and choose Continue with Google or Continue with GitHub. There is no password to set up.
Step 2 — Create a workspace
A workspace is one isolated project: its own task board, its own agent connection, its own MCP endpoint. From the workspaces list, click New, give it a name, and open it.
Keep one workspace per repository or per project. The gateway connects to exactly one workspace, so the boundary you draw here is the boundary Antigravity works inside.
Step 3 — Add the .mcp.json config
Open your new workspace, go to Settings → Setup, and pick the Antigravity tab. The first panel is a .mcp.json block with a Copy Config button.
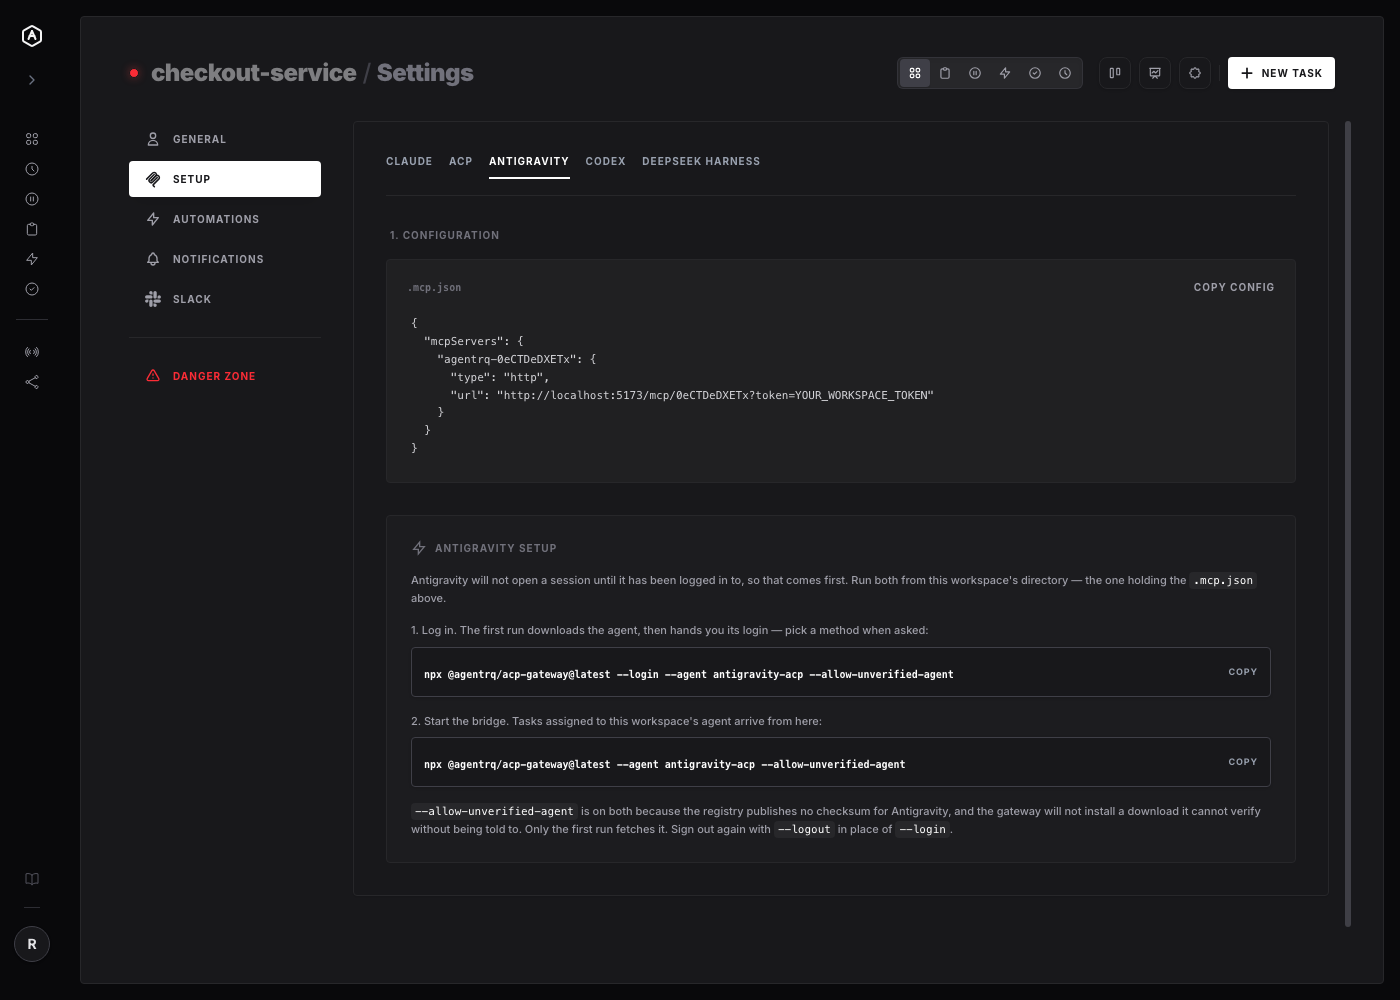
Save that file in the root of the project you want Antigravity working in. It looks like this:
Copy your own from the app rather than adapting this one. The server name and the subdomain are built from the same workspace but encoded differently, so they are not the same string, and the token is specific to your workspace. Treat the token like a password: it is what authorises the gateway to act in that workspace.
Every gateway command from here on must be run from the directory holding this file. That is not just true of the one that starts the bridge — the gateway loads the config before it does anything at all, so even asking it to list models fails without it:
The gateway also searches up to three parent directories, so a .mcp.json at the repo root covers subdirectories beneath it.
Step 4 — Log in to Antigravity
Antigravity refuses to open a session before it has been authenticated, so this comes first:
The first run downloads the agent (the registry's current build is 1.1.1), then hands you its login. Antigravity offers four methods:
| Method id | What it is |
|---|---|
oauth-personal |
Log in with your Google account |
oauth-business |
Log in with your Gemini Enterprise account |
gemini-api-key |
Use an API key with the Gemini Developer API |
agent-platform |
Gemini Enterprise Agent Platform (formerly Vertex AI) |
Pick one when prompted, or name it directly: --login oauth-personal. Credentials are never stored by the gateway — Antigravity keeps its own, exactly as it would under an editor. Sign out later with --logout in place of --login.
Why the --allow-unverified-agent flag
The gateway verifies every binary it installs against the checksum the ACP registry publishes, and refuses to install one it cannot verify. Antigravity is distributed as a binary with no sha256 on any of its five platforms, so without the flag you get this instead of an install:
That is a deliberate default, not a bug: roughly half the binary targets in the registry omit a checksum, and the gateway would rather stop than run something it cannot vouch for. Passing the flag is you making that call. Keep it on every command — leaving it off is an error, not a different behaviour.
The download only happens once. Afterwards it is cached per agent, version and platform:
| Platform | Cache location |
|---|---|
| macOS / Linux | $XDG_CACHE_HOME/acp-gateway/agents, else ~/.cache/acp-gateway/agents |
| Windows | %LOCALAPPDATA%\acp-gateway\agents |
If you would rather install Antigravity yourself, you can skip the registry entirely and pass your own command after --, which is the general form of every gateway invocation:
Step 5 — Choose a model
Ask the agent what it supports:
At the time of writing that returns eleven Gemini variants, with the current one marked:
The high / medium / low suffix is the reasoning effort, so the choice is two decisions at once: which model, and how hard it thinks. Select one with --model, which accepts either the id or the display name:
The gateway sets the model on each session as it opens, and reports it back to AgentRQ — so the workspace shows which model actually ran, not which one you meant to run. Ask for a model the agent does not have and it says so, lists the ones it does have, and carries on with the current one rather than failing the task.
Step 6 — Start the bridge and let it run
Leave it running. That process is the bridge: it holds the MCP connection to your workspace open, reconnecting on its own if the network drops, and spawns Antigravity as a subprocess underneath.
Now file a task in the workspace, assigned to the agent. Here is what happens:
- The task arrives over MCP and the gateway forwards it to Antigravity as an ACP prompt.
- Antigravity gets its own ACP session for that task, so concurrent and consecutive tasks never share state.
- When it wants to run something that needs approval, the request surfaces in the AgentRQ UI — you allow or deny from wherever you are, and the verdict goes back.
- Its reasoning and tool calls stream into the task's trajectory view as it works.
- When the task finishes, the gateway checks for the next pending one automatically.
You can walk away at that point. That is the entire reason the bridge exists.
Flags worth knowing
- →
--max-concurrency— how many tasks may prompt the agent at once. Defaults to2in v0.2.9. - →
--list-agents— every agent the registry publishes, and how each can run on your machine. Antigravity shows up asantigravity-acp Google Antigravity — binary. - →
--list-auth-methods— the login methods an agent advertises, without logging in. - →
--logout— ends the agent's authenticated state. - →
--help— every option, with examples.
Troubleshooting
Could not find .mcp.json — you are not in the workspace directory. The gateway looks in the current directory and up to three parents.
The ACP registry publishes no sha256... — add --allow-unverified-agent, and keep it on every subsequent command.
Nothing happens when you file a task — check the task is assigned to the agent, not to a human. The gateway pulls the next not started task assigned to the agent.
Antigravity asks to log in every time — you are likely running from a different directory or user profile than the one you logged in from. The agent stores its own credentials; the gateway does not hold them.
Where to go next
The same gateway connects Gemini CLI, Codex, Cursor, Cline and thirty-odd other agents — --list-agents shows the current set, and the flow above is identical for any of them. Only the two Antigravity-specific flags change.
If you want tasks to chain — one agent finishing kicks off the next — that is what Events and Workflows are for, and the agent fires them with the same publishEvent tool it already has.
Create a workspace and connect Antigravity — free during beta.