
Connect Agents with the ACP Gateway and Machines
To connect an ACP agent to an AgentRQ workspace, enrol the computer that should run it as a machine, then click Start an agent in the workspace, pick ACP Gateway, choose the agent, its model and its effort, and start it. AgentRQ runs the open-source ACP Gateway on that machine for you. If you would rather not enrol a machine, you can run the same gateway yourself from a terminal. This guide shows both, click by click, with Google Antigravity (antigravity-acp) on Gemini 4 Hydrogen at High effort.
This page is one of our connect agents guidelines. It was checked against AgentRQ and acp-gateway on November 14, 2026, and every screenshot below comes from a real run.
What the ACP Gateway Does
The Agent Client Protocol (ACP) is how editors and tools talk to coding agents. The ACP Gateway sits between an ACP agent and your AgentRQ workspace: it starts the agent, connects to the workspace's MCP server, and hands the agent each task you assign. The agent's replies, questions and approval requests come back to the workspace, where you answer them.
The gateway downloads agents from the ACP registry, so any agent listed there works the same way. Antigravity is the example here; swap in another agent id and the steps do not change.
Before You Start
- → An AgentRQ workspace with a working directory set in its General settings. That folder is where the agent runs on the machine. The example workspace is
storefront-api. - → A computer for the agent: your laptop, a desktop or a server. It needs Node.js, because the gateway runs through
npx. - → An account for the agent you pick. Antigravity signs in with Google.
Option 1 (Recommended): Run It on a Machine
A machine is a computer running agentrqd, the small AgentRQ daemon. Once it is enrolled, you start, watch and stop agents on it from AgentRQ, from any browser.
Step by Step: Enrol the Machine
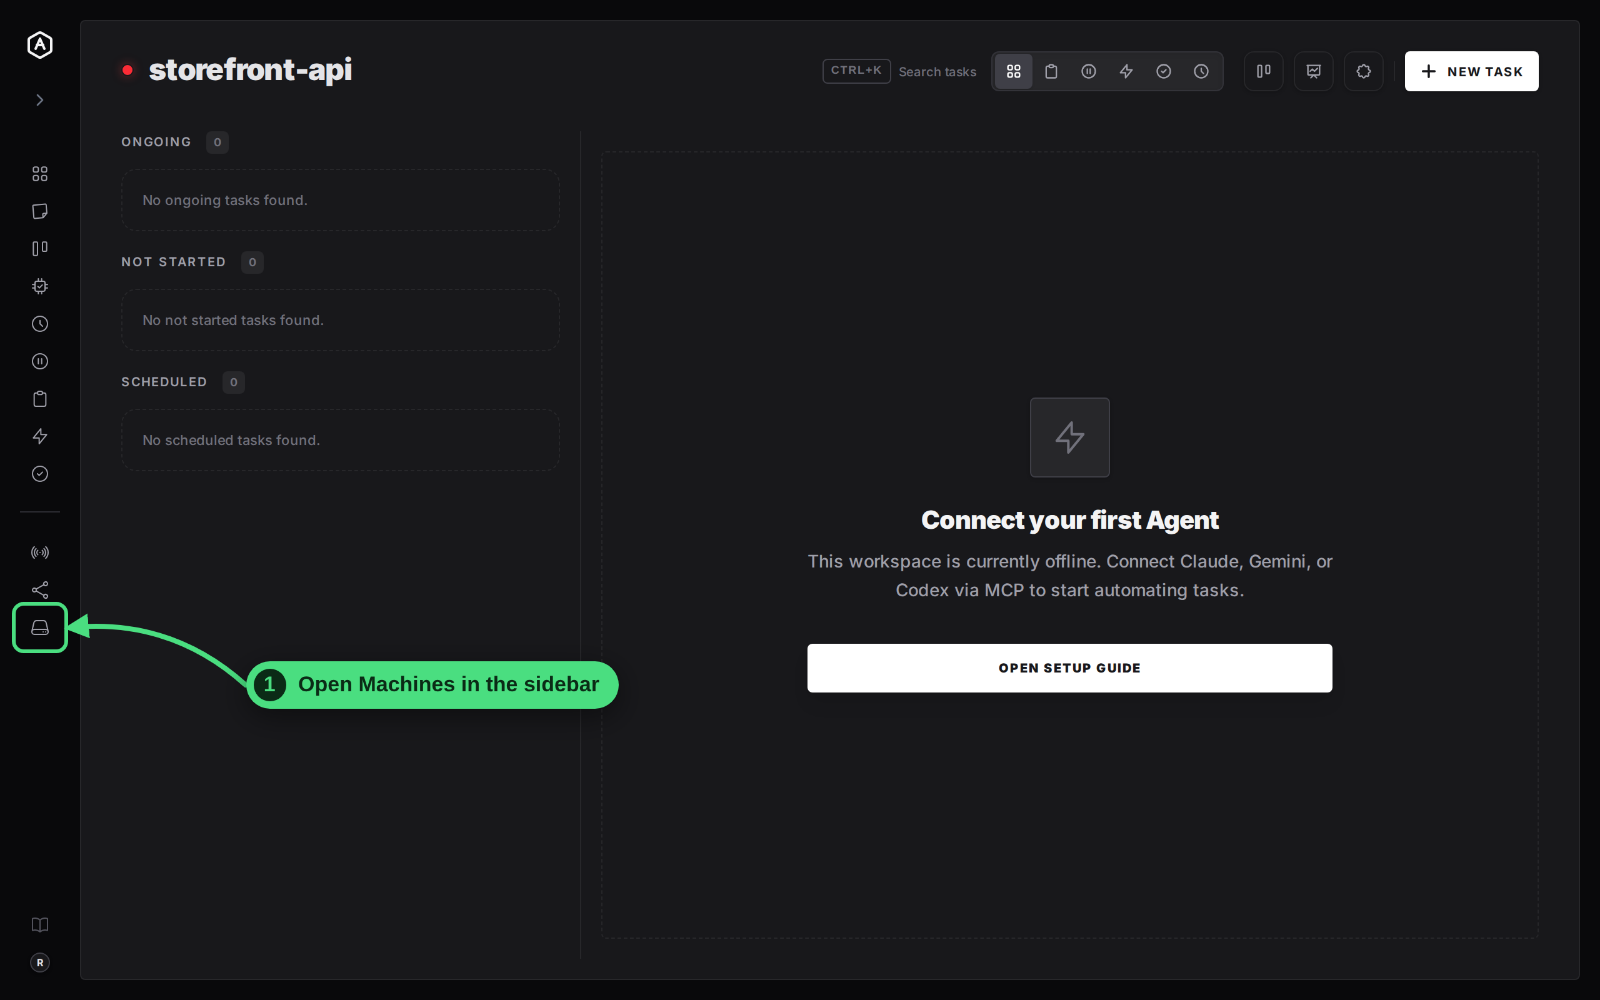
1. Open Machines in the sidebar.
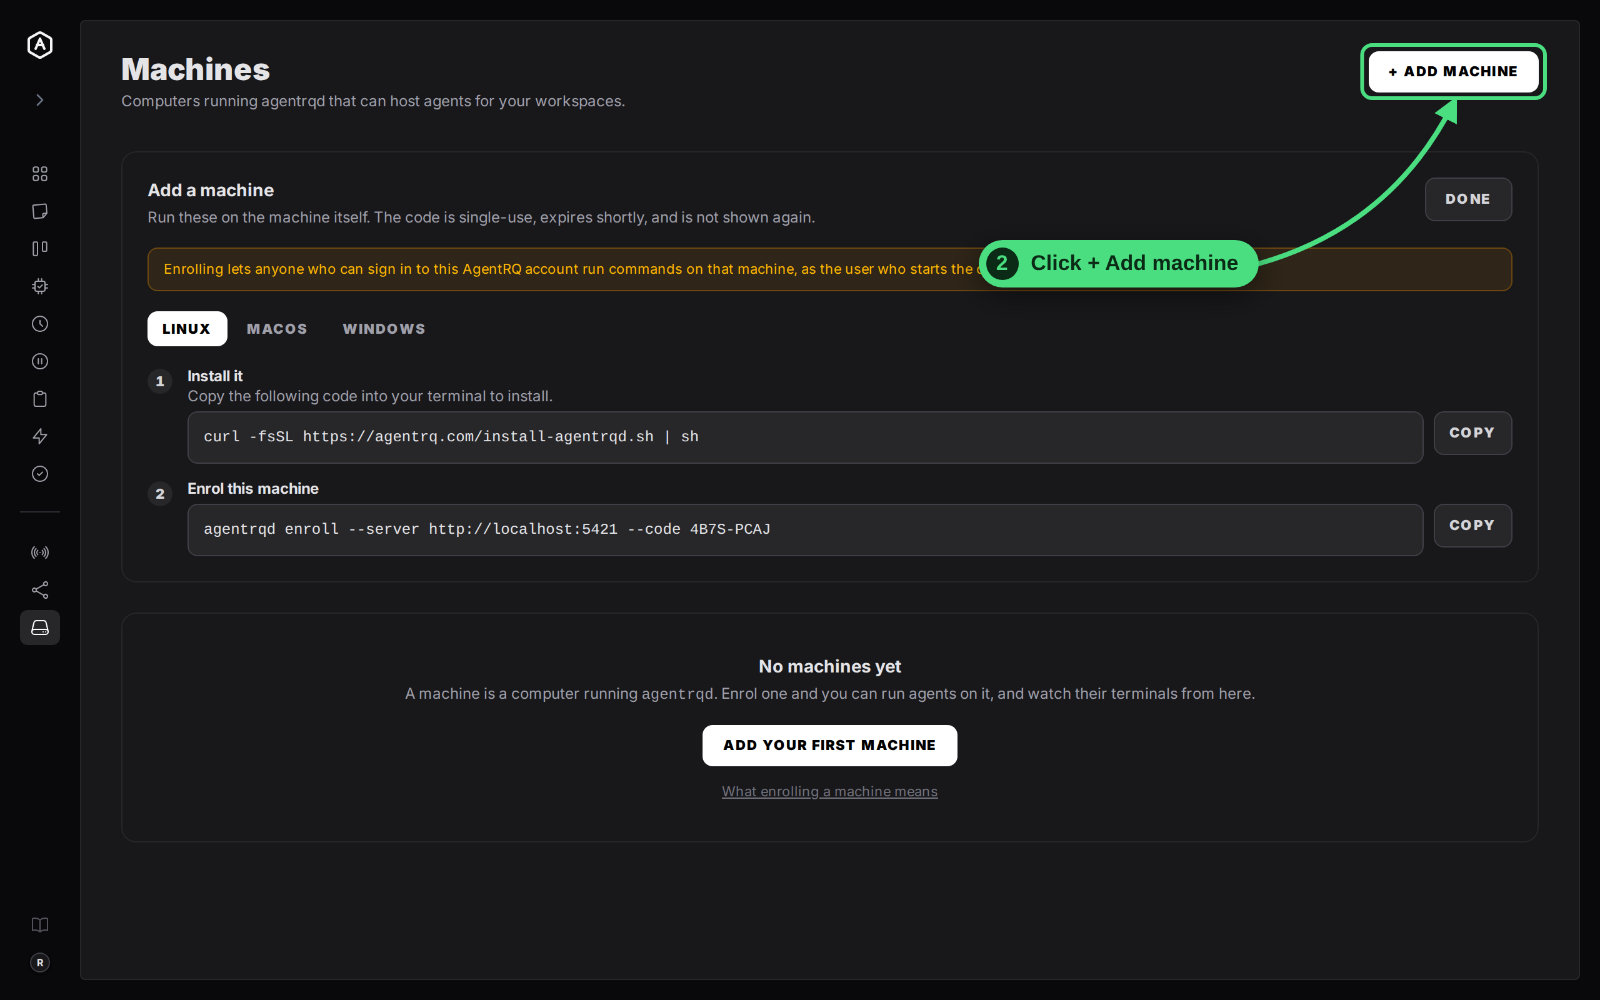
2. Click + Add machine.
3. Run both commands on the machine that will host the agent. The first installs agentrqd to ~/.local/bin after checking it against the release's published checksums. The second enrols it with a one-time code, and starts it in the background. Pick the Linux, macOS or Windows tab to match the machine.
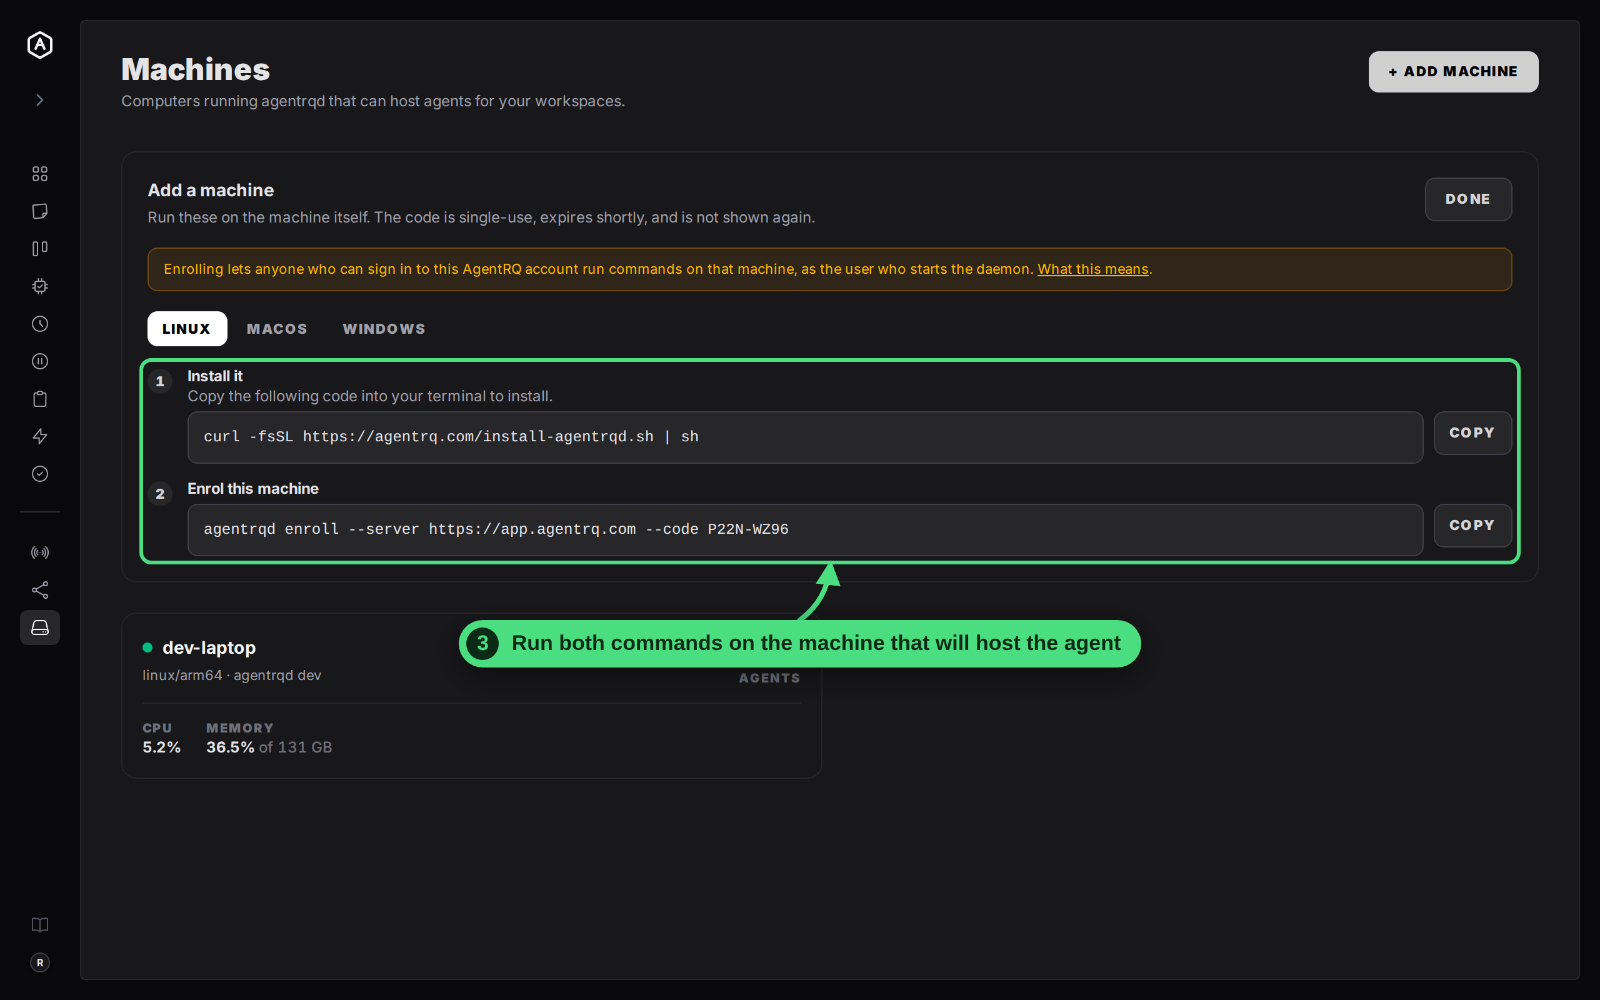
The code is single-use, expires after a few minutes and is shown only once. Run agentrqd as yourself, never as root: it refuses to run as root or Administrator, because an agent it starts inherits its user's rights. Enrolling lets anyone who can sign in to your AgentRQ account run commands on that machine, so enrol only machines you would trust that account with. The machines and daemon docs cover what that means, how to keep agentrqd running as a service, and how to undo it.
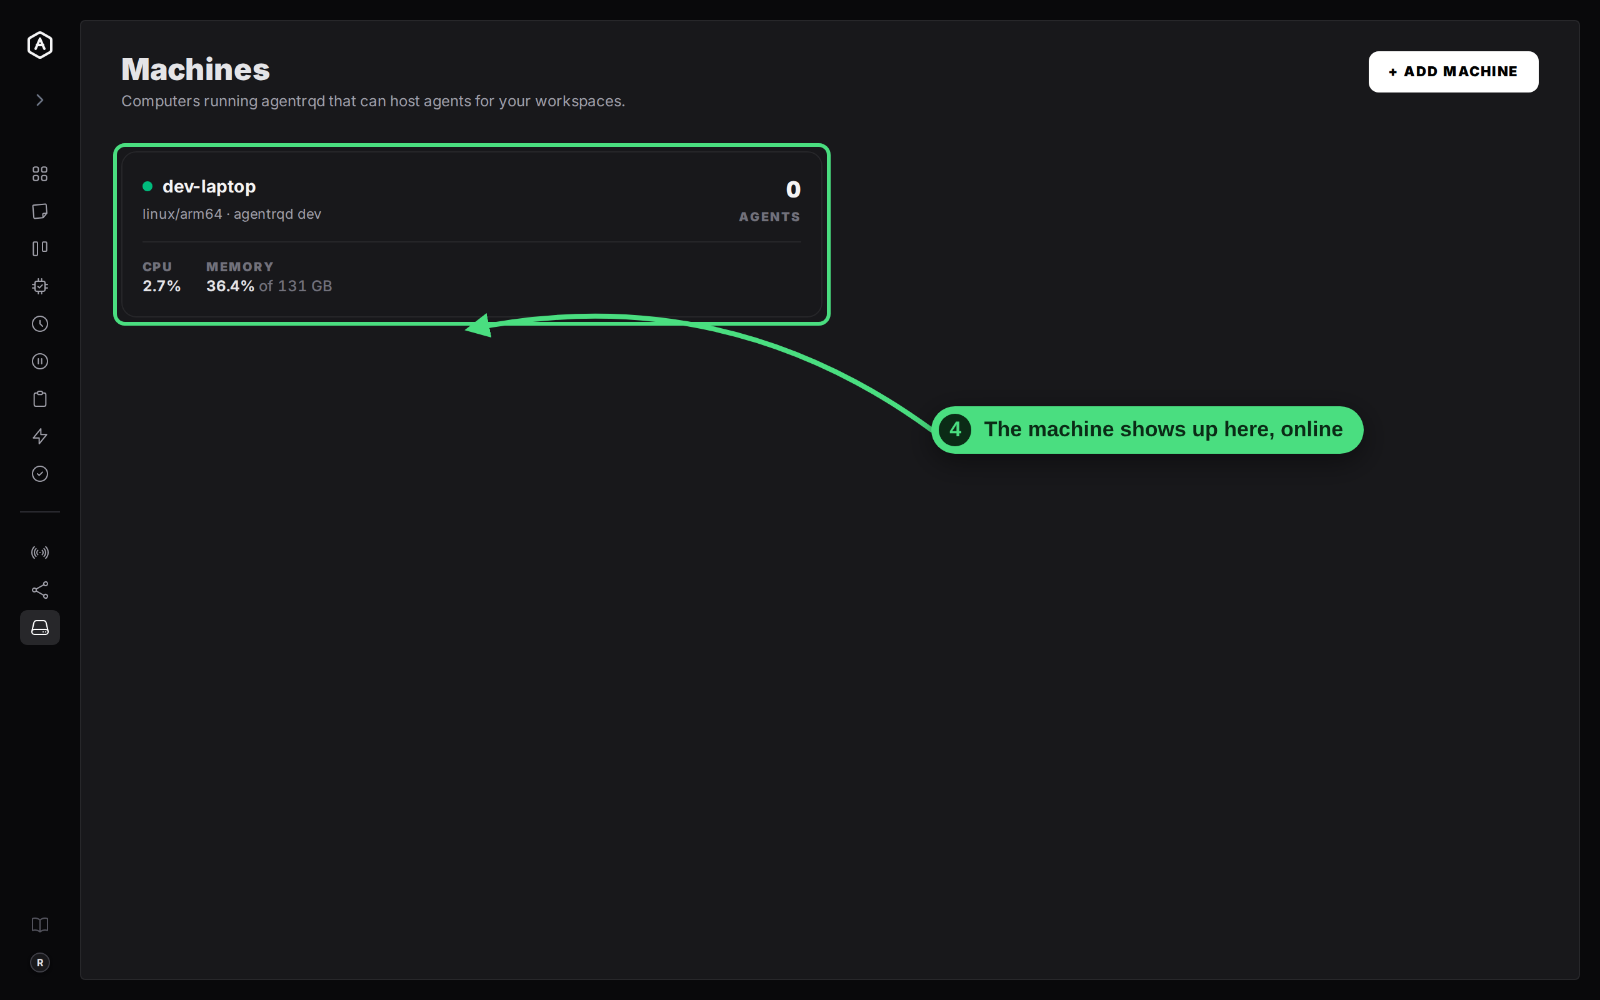
4. Check that the machine is online. It appears on the Machines page with a green dot, its platform and its CPU and memory.
Step by Step: Start Antigravity on Gemini 4 Hydrogen
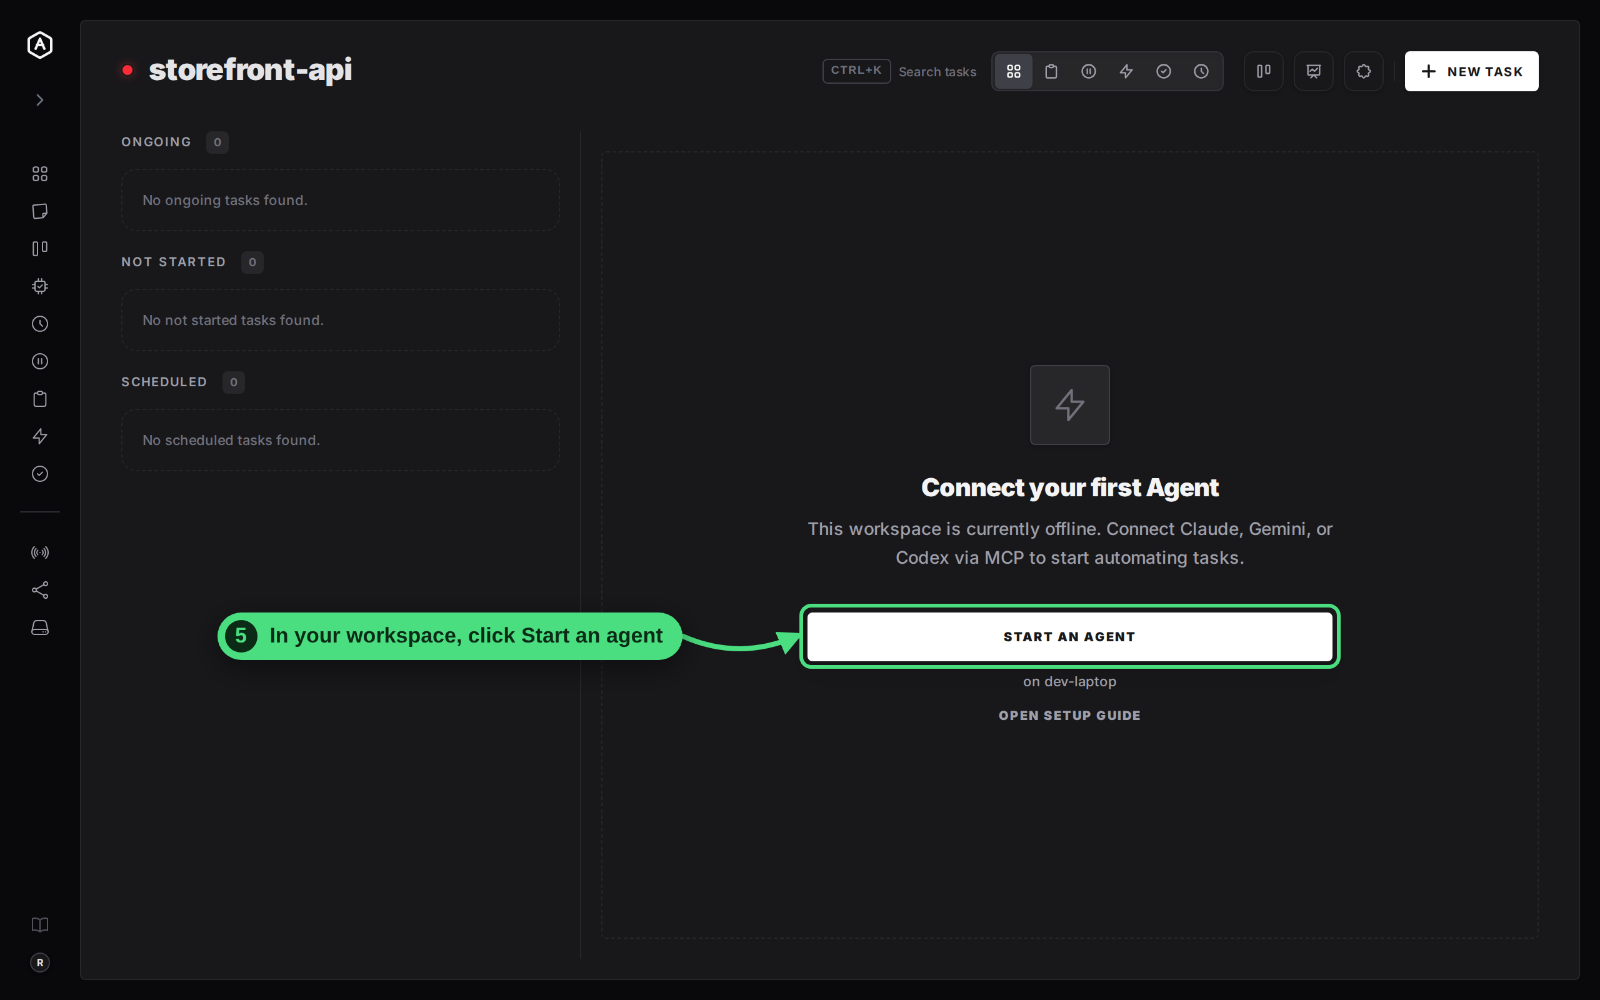
5. Click Start an agent in your workspace. Once a machine is online, an empty workspace offers it in the middle of the page. You will find the same card at the top of the workspace's Settings → Setup tab.
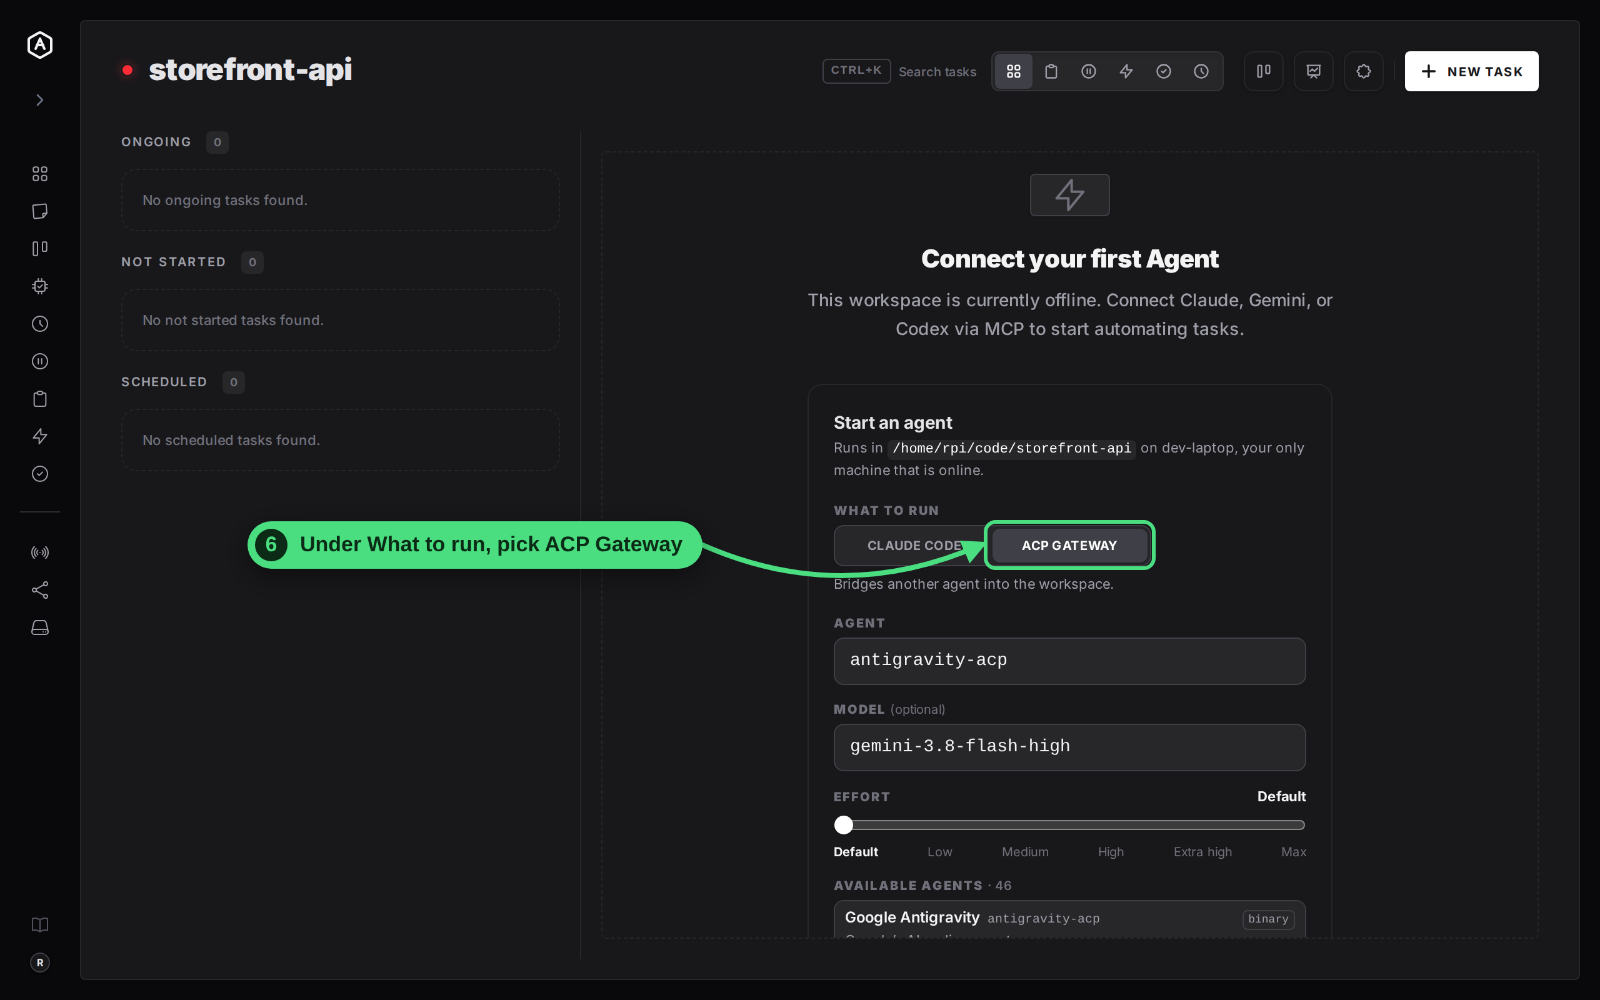
6. Under What to run, pick ACP Gateway. The other choice, Claude Code, runs Claude Code directly. The card also says which folder and which machine the agent will run in.
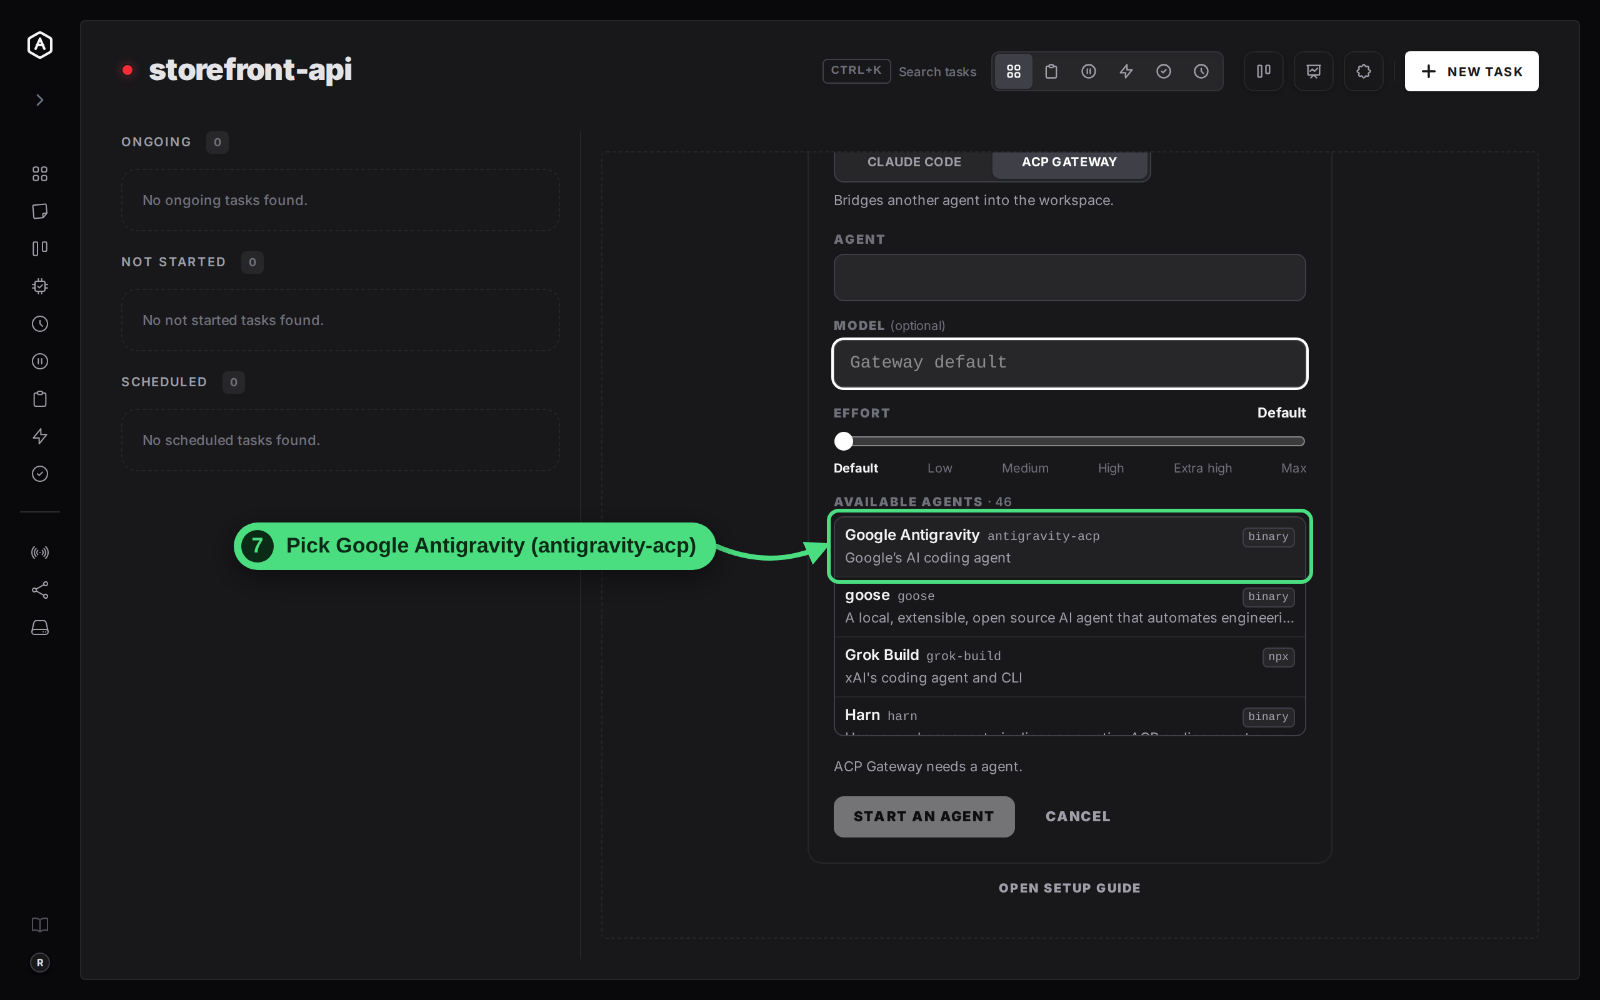
7. Pick Google Antigravity from Available agents. The list holds every agent in the ACP registry, plus any agent the machine's gateway knows about that the registry does not. Typing in the Agent field filters it, and the binary or npx tag says how the agent is installed.
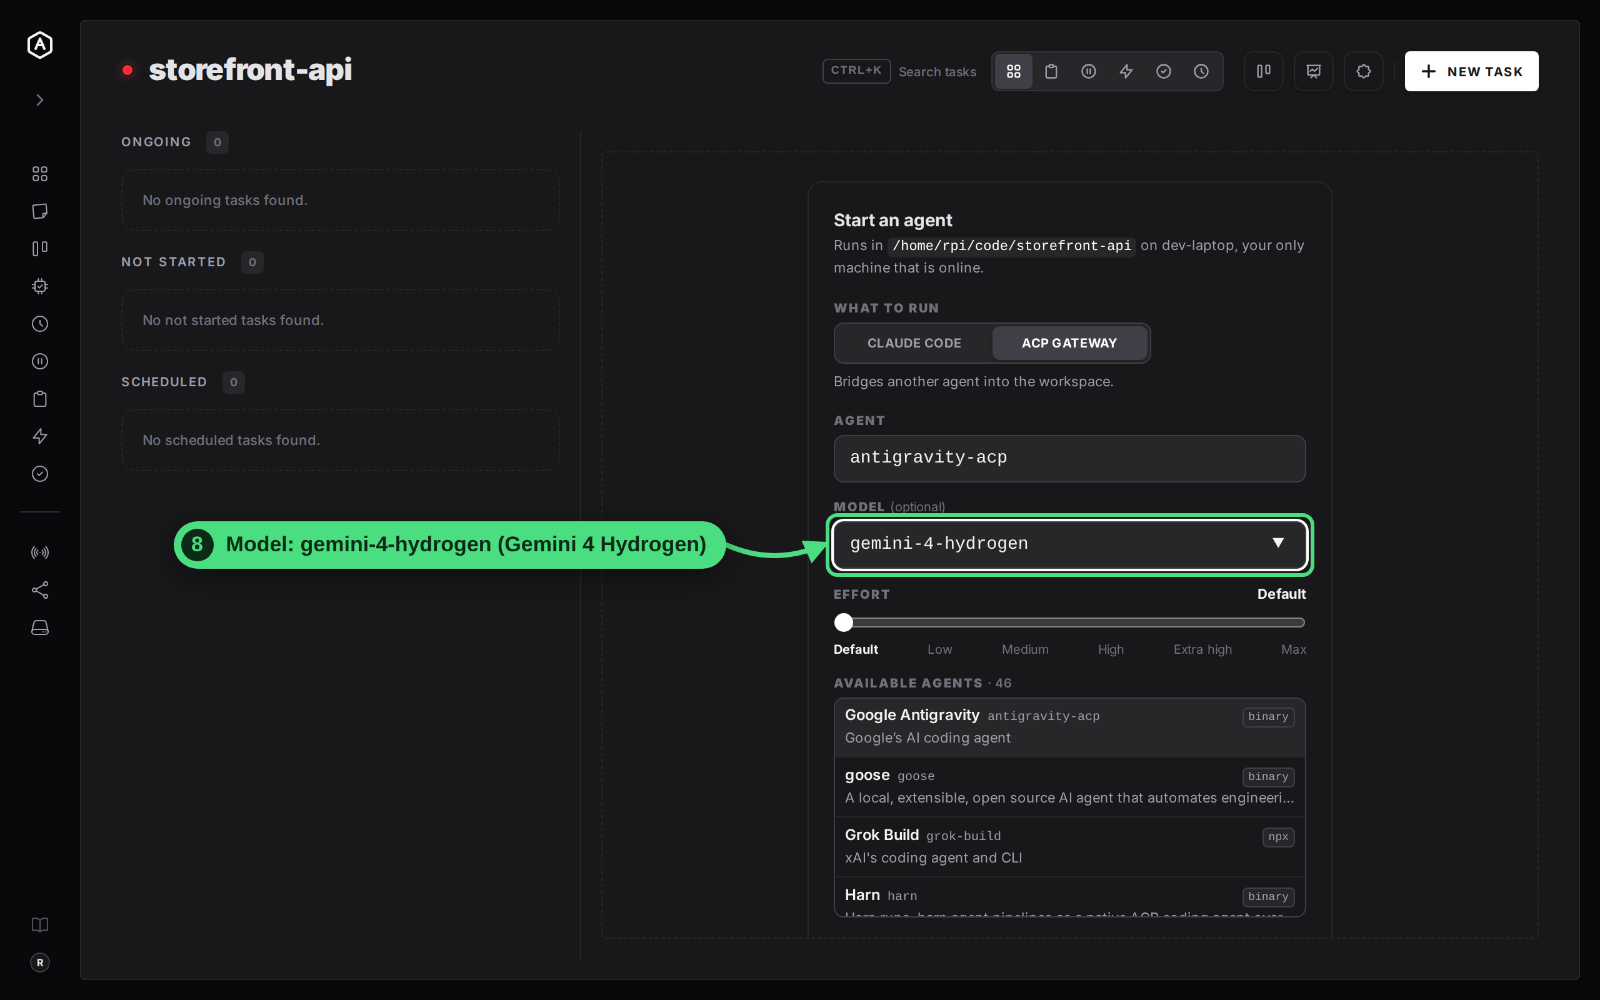
8. Set the Model to gemini-4-hydrogen. Once an agent is picked, AgentRQ asks the machine's gateway which models that agent offers and suggests them as you type. For Antigravity that is gemini-4-argon (Gemini 4 Argon), gemini-4-hydrogen (Gemini 4 Hydrogen) and gemini-3.8-flash (Gemini 3.8 Flash). Leave the field empty to use the agent's own default.
9. Slide Effort to High. The steps are Default, Low, Medium, High, Extra high and Max. Default leaves the choice to the agent.
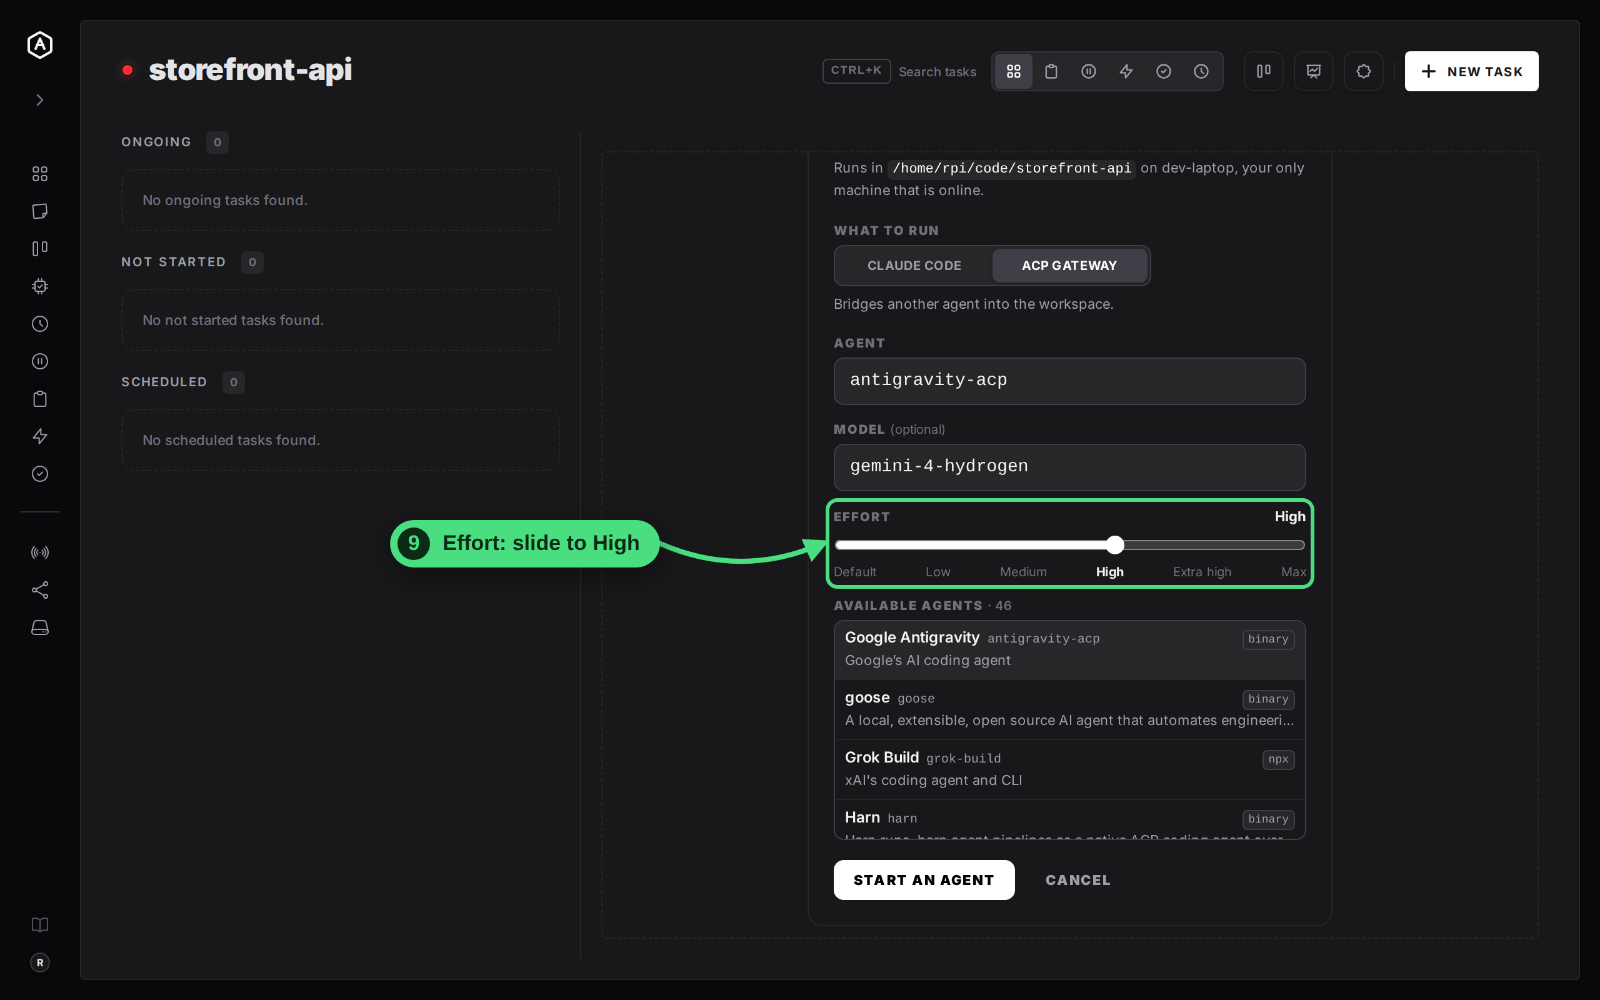
10. Click Start an agent. If the registry publishes no checksum for the agent on that machine's platform, AgentRQ first asks you to tick a box to install it anyway, since its download cannot be verified.
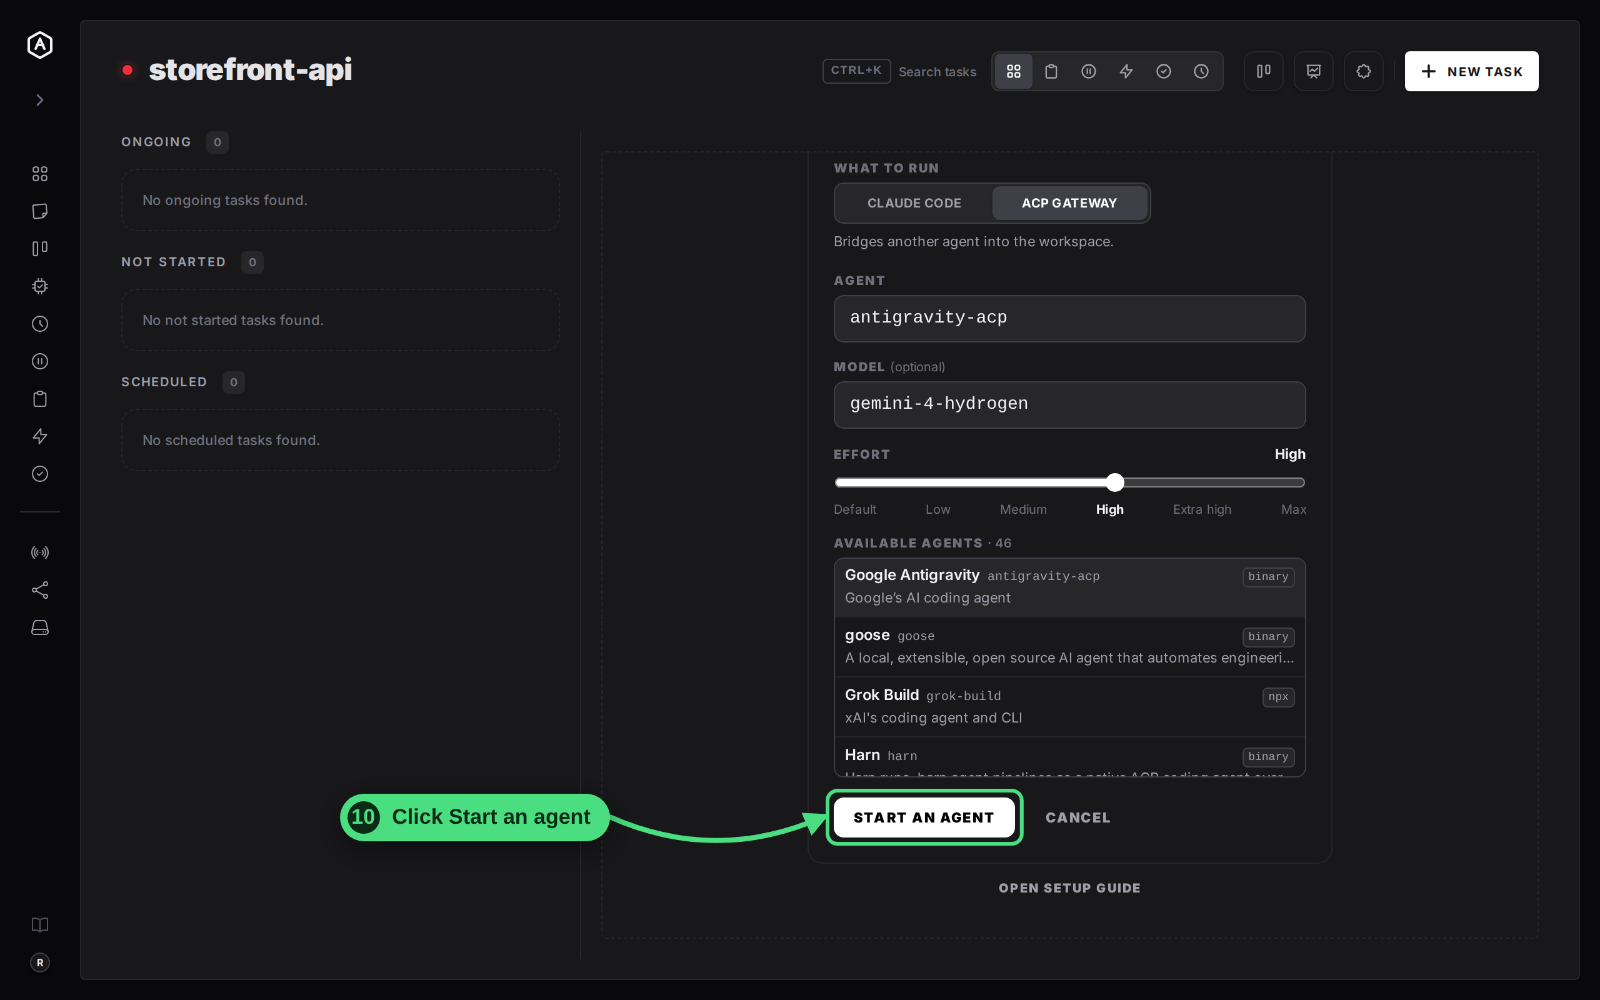
AgentRQ opens the agent's live terminal, with a Stop button. On the machine, agentrqd writes the workspace's .mcp.json into the working directory and runs exactly what you would type yourself:
11. Check that the agent is connected. Back in the workspace, the dot next to its name turns green and the page says the agent is connected and ready. Create a task, and Antigravity picks it up.
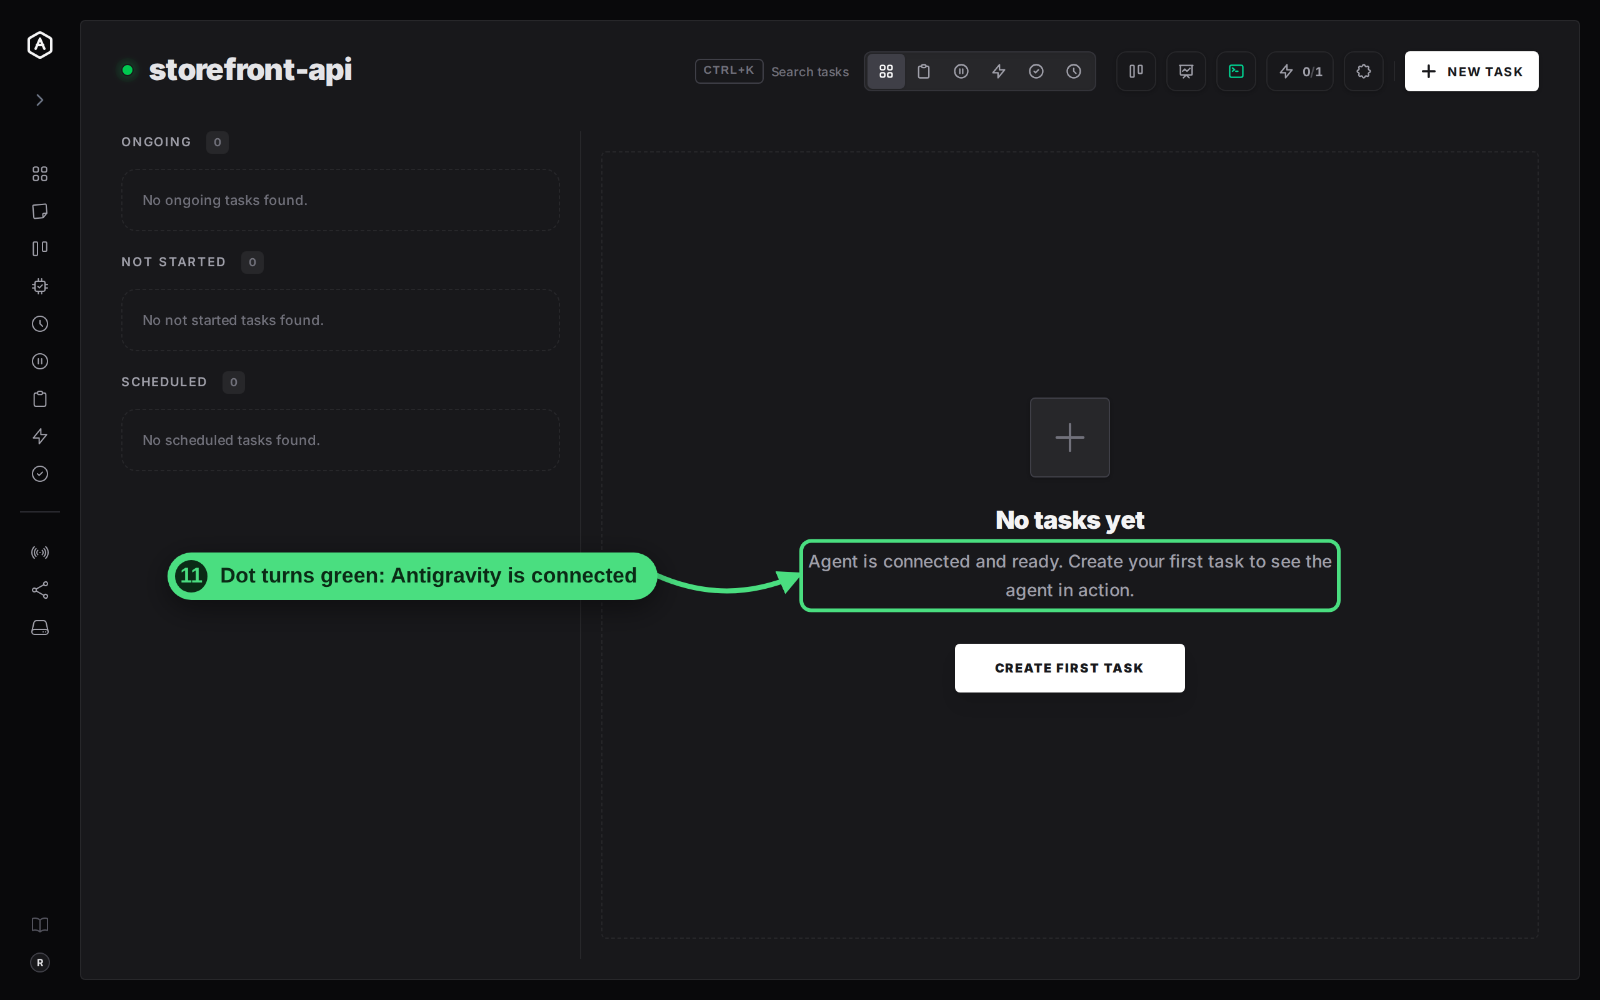
Antigravity will not open a session until it has been logged in to on that machine. If it has never run there, log in once on the machine first, from the workspace's folder, with the command in step 4 of Option 2 below.
Option 2: Run the ACP Gateway Yourself
No daemon, no enrolment: you run the gateway in a terminal, in the folder you want the agent to work in.
1. Open the workspace Settings with the gear at the top right.
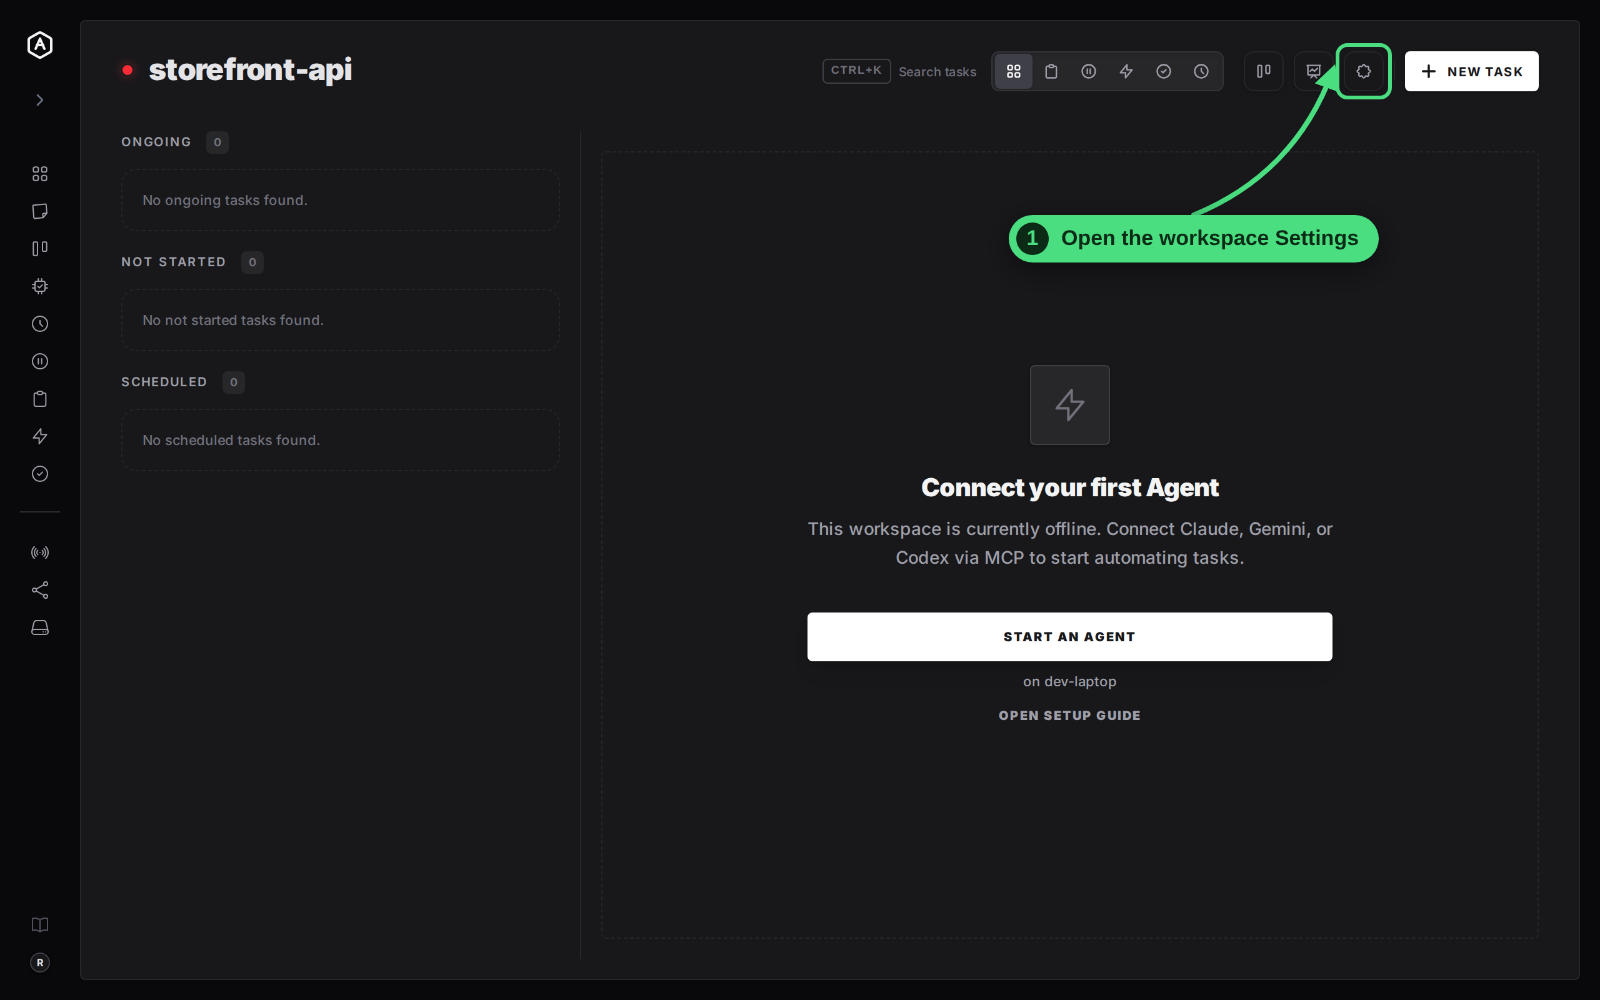
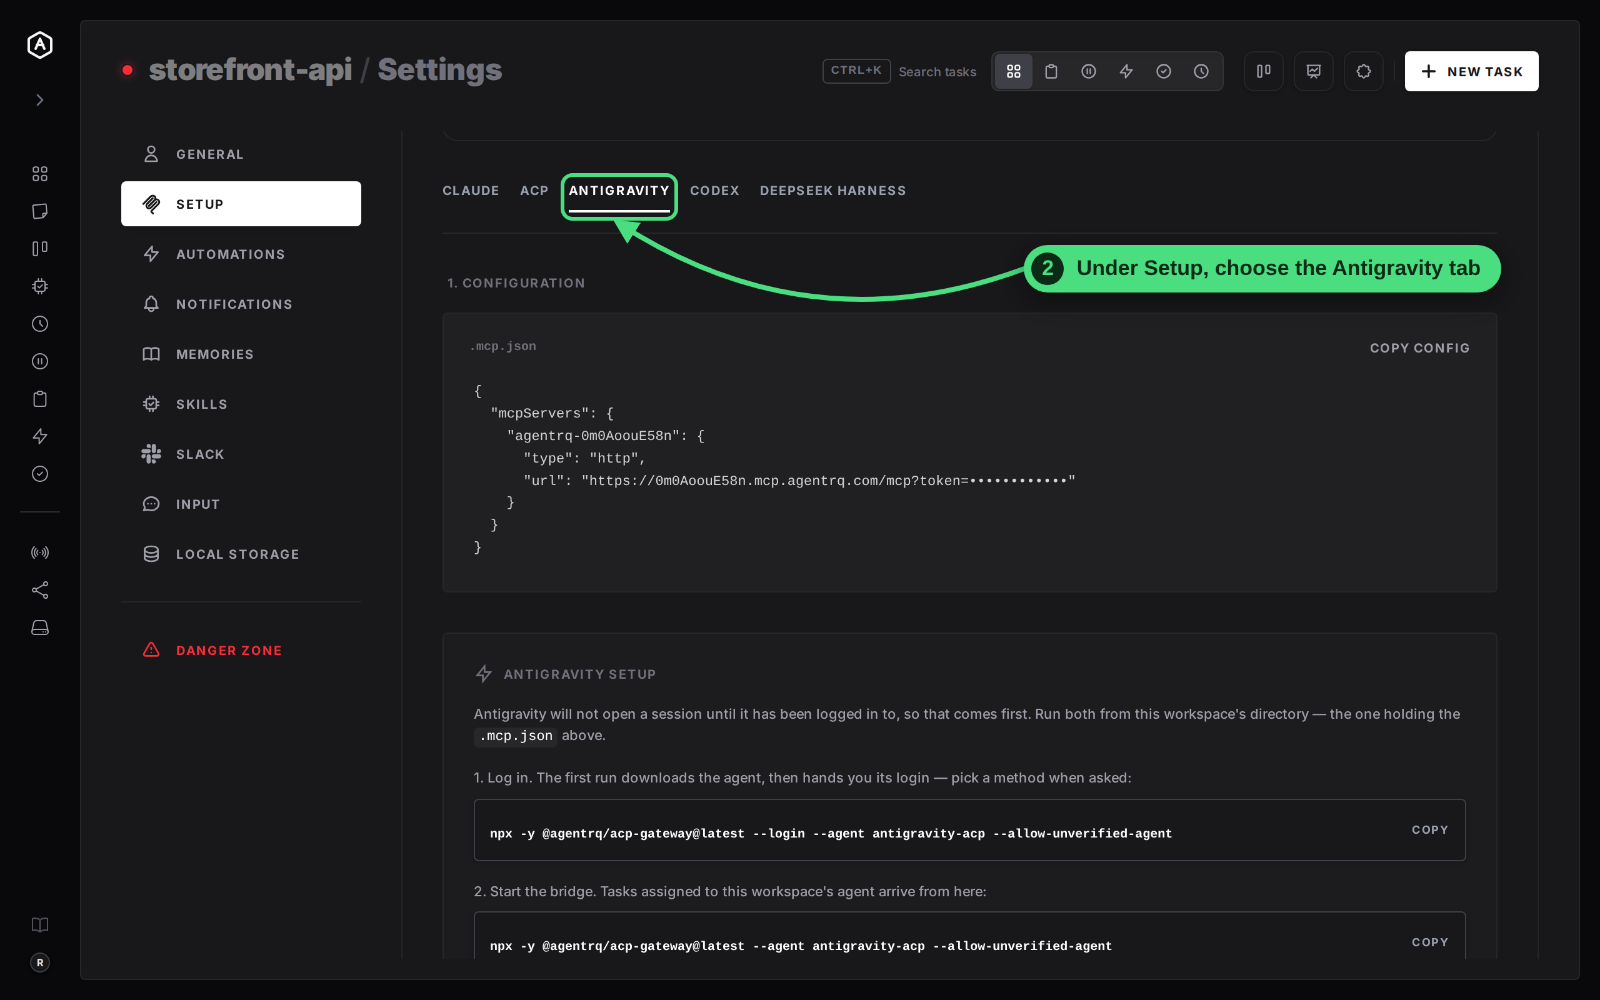
2. Under Setup, choose the Antigravity tab. The ACP tab next to it has the same commands for any other agent in the registry.
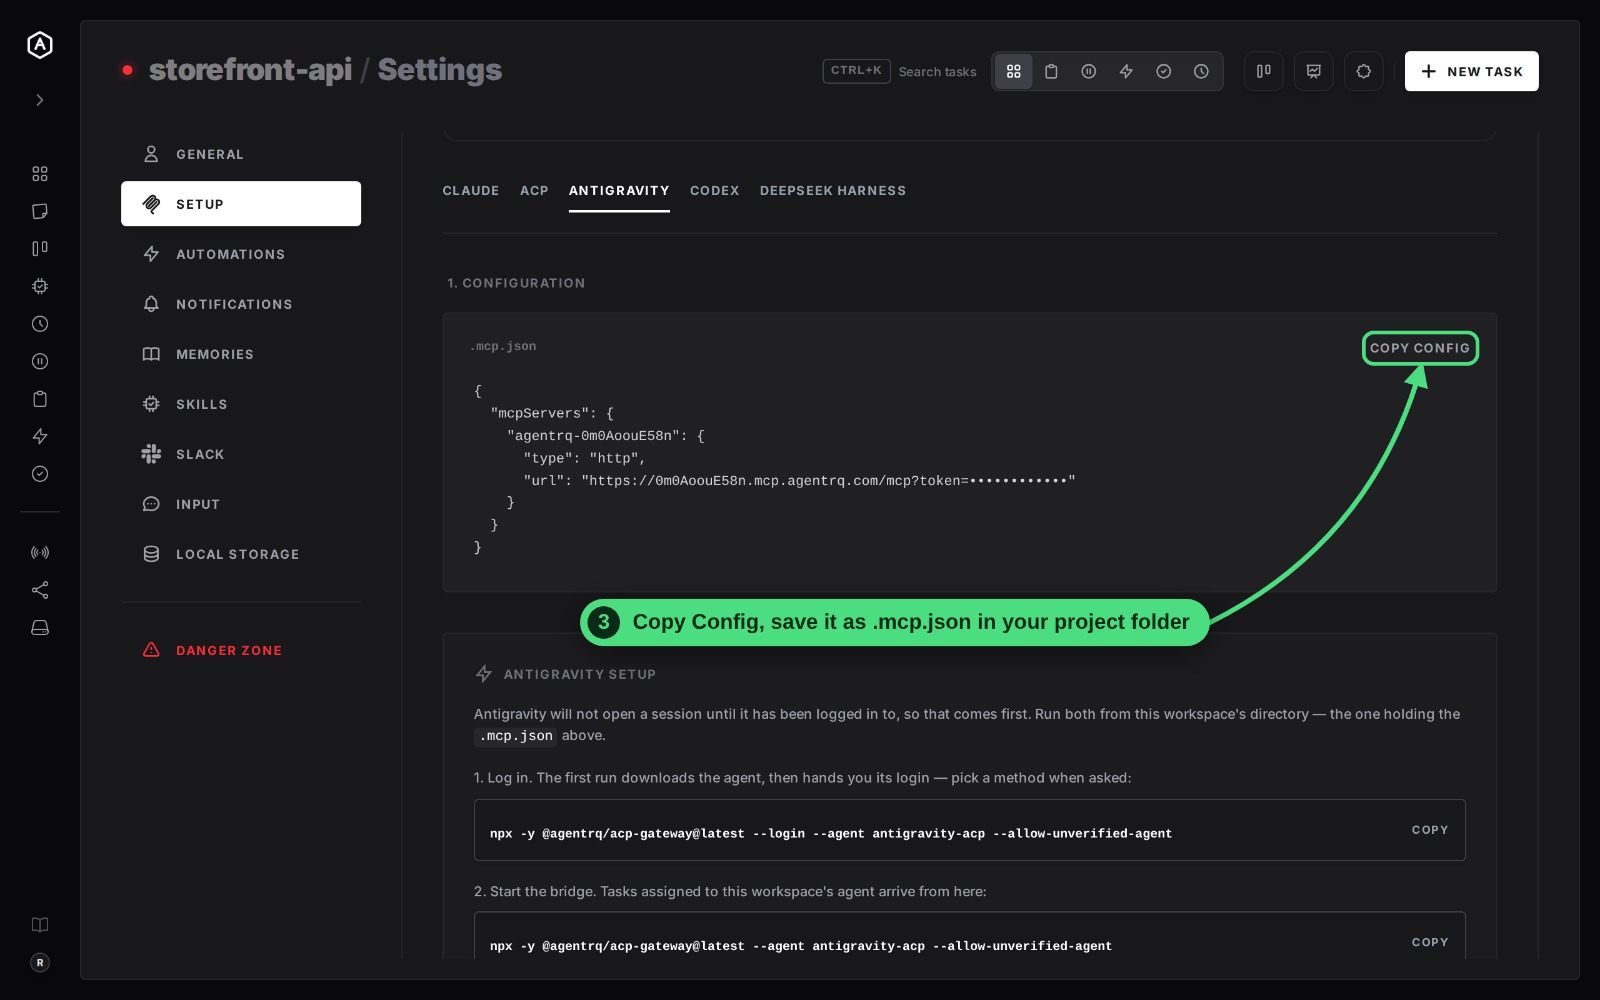
3. Click Copy Config and save it as .mcp.json in your project folder. It holds the workspace's MCP URL and its token, so keep it out of git. If it ever leaks, reset the workspace ID.
4. Log in once, then start the bridge, both from the folder holding .mcp.json. The first run downloads Antigravity and walks you through its Google sign-in.
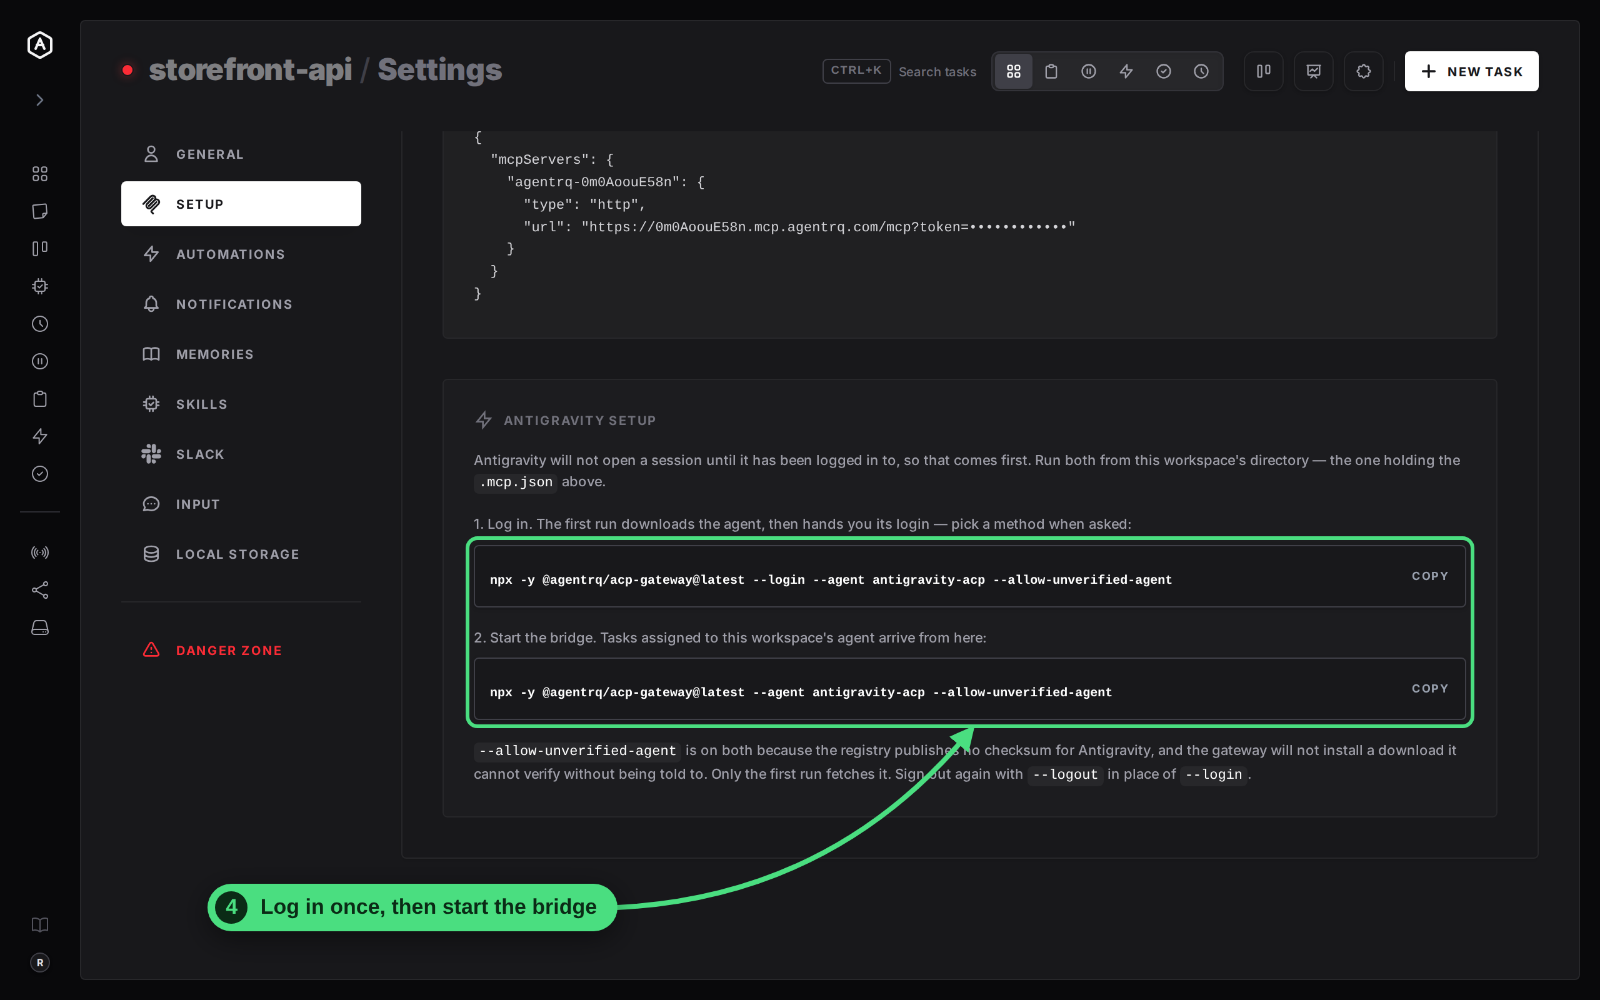
Add --model and --effort to the start command to run Gemini 4 Hydrogen at high effort:
You no longer need --allow-unverified-agent for Antigravity: the ACP registry now publishes a checksum for every Antigravity build, so the gateway verifies the download itself. The Setup card may still show the flag, and it is harmless there. When the gateway is connected, the workspace's dot turns green, exactly as in step 11 above. Stop it with Ctrl+C. The ACP Gateway docs cover the gateway's other flags.
Machine vs Terminal at a Glance
| On an enrolled machine | From your own terminal | |
|---|---|---|
| Install | agentrqd, once |
Nothing, npx fetches the gateway |
| Config file | Written for you | Copy .mcp.json yourself |
| Start and stop | From AgentRQ, any browser | In that terminal |
| Watch the agent | Live terminal in AgentRQ | That terminal |
| Pick model and effort | Fields in the Start an agent card | --model and --effort flags |
| Best for | Agents you run every day | A quick try, or a one-off |
Using Another Agent
Every agent in the ACP registry connects the same way. In Option 1, pick it from Available agents instead of Antigravity; in Option 2, put its id after --agent. Run npx @agentrq/acp-gateway@latest --list-agents to see every id, and --list-models with an agent to see its models. The ACP setup page for each agent has its id, login and quirks, and the ACP setup guide covers the gateway's other options.
FAQ
Does the machine need to stay on?
Yes. The agent runs on that machine, so it works only while the machine is on and agentrqd is running. If the machine sleeps or restarts, start agentrqd again (or install it as a service) and it reconnects on its own.
Can one machine run agents for several workspaces?
Yes. Each workspace starts its own agent on the machine, in its own working directory. A workspace runs one agent at a time.
Why can't I find Start an agent?
AgentRQ offers it only while at least one of your machines is online and the workspace has no agent connected. If the card is there but its button is greyed out, the line above the button says what is missing, such as a working directory for the workspace.
Can I change the model after starting?
Yes. The model chosen at start is the one the session begins on, and you can change it while the agent runs from the AgentRQ interface.